You haven’t heard from me since a long time, right? I have nothing on my defence and the only word that comes to my mind is an obvious “sorry“. And I am sorry, truly sorry for not writing anything for such a long period of time. Maybe I will think of some kind of punishment for myself, or maybe you will think about it? But please, don’t be too harsh one me…
Recently I recieved few really nice and uplifting messages on my Instagram account from people all over the world who find my photography and/or blog very inspiring and I guess I didn’t realize how many people look for information about what is going on behind the camera in street photogprahy.
Oh, and by the way – if you like to join me on INSTAGRAM, please do by clicking HERE.
So, what I had been up to for such along period of time, you may ask. What remarkable photo-projects I have done through these months? Well to be honest, I haven’t done any. I have a wonderful wife and two sons that I need and want to take care of as much as possible and of course my job on my mind as well so let’s state it clear – writing, especially not in your first language may eat your free time faster than anything. This made me think about getting all of this even more simple then before. I just need to write the same way I take photos without much hesitation and calculation. We all know that nothing good will come out of it while doing street photography – so many chances of getting a perfect shot etc. But taking a shot is a one thing and post-processing is another “photographer’s duty” to complete right? Yep, but hey there must be a simpler way.

Last week I took part in 24hour Project that some of you may be familiar with. If you don’t know what is all about – photographers from all over the world take part in documenting their cities once a year through 24 hours. I hadn’t completed the whole 24 hours , but more than 20 hours of shooting I consider as a quite good result. It was a great excuse to simplify the whole process of “making” a photography for me. I uploaded one photo each hour and I had to be quick.
I use Fujifilm X100T as I believe to be a marvelous camera. About month ago I purchased Iphone 8 which of course has a great camera itself but on that day I decided that Iphone would be my digital darkroom. Just like in the old days – the film needed to be developed right? Now we develop a digital film in software. And there is a lot to choose from, that’s for sure. I particulary liked two apps that make everything I need and they do it in less than 60 seconds (in most cases). So here we go with my routine.
Transfer files to Iphone. That is an easy step on Fujifilm X100T because it has Wifi option – so basically what I need to is to open Fujifilm Camera Remote app on my Iphone and transfer the files I want to my phone. The transfer itself can take some time if I choose a lot of files, so I try to send no more than 30-40 shots at the same time. I am not going to describe the whole process of installing an app and setting up a network, but it’s really easy. If I hadn’t Wifi function in my camera I would use a standard SD card reader, where you put your memory card into and you connect it to your phone.
Run Snapseed. If a shot needs to be straighten or cropped I open Snapseed app first. Also, when I feel a need to darken or lighten particular parts of photo (I don’t use it to much though) Snapseed is my first choice. Using crop an straighten is a quick step and sometimes I need to do it when the angle is not good or I want to crop my shot a bit.

Run Darkroom. This app is generally all I need. As the name itself – it is a digital, mobile darkroom. You can post-process your shots quickly and you can do it wherever you are. I always thought that I need to edit my shots on a computer screen and use Lightroom to achieve look that I desire. However, lately I’ve revised my ways. Of course without doubt Adobe software is an amazing workhorse and seeing photography on a bigger scale like computer monitor is priceless but I realised that all of this took really loads of time and I needed to be in front of computer to do anything with a photo. I thought to myself – wait a minute, I don’t need a high-res files of an every single shot and I don’t need to upload to Lightroom and edit it and connecting camera and deal with computer and all that stuff. Yes – when I would need a photo to be printed I would definately post-process it on my computer but let’s be honest – how often do we need it? Just look at great street photography masters like Vivian Maier or Henri Cartier-Bresson, did they took care of pixels ? 😉

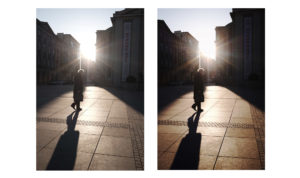
First of all – Curves. One of the best thing in Darkroom app. You can easily balance your photo with Shadow, Highlights, Blacks, Midtones and White sliders. I guess you heard about “S” rule – you move those sliders in order to get the line as close as flat “S” letter. Lowering shadows, changing midtones and increasing highlights should do the job. But it is only a theory, a certain look of a photo. First of all – it doesn’t need to fit all of shots and secondly, what is most important – it doesn’t have to reflect your style. So what I advise you to do is playing a bit with those sliders. Take various shots and try to move those sliders to get the idea how does it work and what can you achieve with it. I usually decrease shadows a bit and increase highlits. It works well for my shots. For the low-light photography it helps to show the main subject better and in the full sun or golden hour shots it creates a nice contrast and also helps to enhace what I call flood with light. This is a type of a shot that you can see below when sunshine is really low (early morning or late afternoon) and it almost pours into the frame. I really like these kind of shots. You can see straight from camera jpg file and the result from Darkroom. Post-processing of this photo itself took me less then 60 seconds. After playing with sliders a bit I go to adjust tools where sometimes I add some contrast or vignette or I take the saturation down when I want my photo in black and white.

On the other hand when I leave it in color I go to color options (the one that has 3-circles icon).Playing with color can be a tricky business. If you start playing with it too much you can really go over the edge and make your shots look unnatural. It is always good to make more or less similar color correction in order your shotos would look consistent. If that would be so easy right? I for example love light itself and I relate light with warm colors – orange, red and yellow. I am not fond of colder tones and I don’t like them to be too visible on my shots so what I do when a shot is a bit too cold for me is decreasing blue/purple/green and on the other hand moving slider up for orange or/and yellow. It really depends on the shot – some of them are completely fine without color correction but some of them can use a little bit. I like to do it this way, I can post-process a shot to make it look like my eyes had seen the scene and I can do it so quickly on my phone.

One last thing – what do I do when the colors on the shot are flat, washed out and generally speaking they suck? Well, I make black and white photo of it and I don’t care about colors, as simple as that. If the colors are realy lame, I give them up in favour of monochrome. I just can do it in “only black and white mode” neither in “only color mode”. I want two have two options. It’s like in the old days when shooting on film – you could always buy a color film or black and white film, now it’s so much better as you can choose what suits you better after taking a shot. How cool is that?
To simplify your photography workflow is a great thing to do. Because of that you can focus on what’s the most important : taking photos. You can only benefit from it. Look how much time you can save by post-processing your shots in an automated way. And remember : if your photo tells a story or is composed in a unique and beautiful way or the timing is so perfect or the light is simply stunning – 99% of work is done.
Feel free to write what you think about it in the comments section below.


Hi Marcin, dropped by because of the light, perused because of the passion, enthralled by the emotion you convey. You must be one of the most understated photographers I have come across, but the intensity of your photos, and the simplicity of your words has my attention because of the resonance it creates. You are an inspiration. You have my attention.
Hi Maxx!
Many thanks for such kind words – it motivates me to continue my photography journey. I am more than happy to hear than my photos are source of inspiration. Are you more into street photography or other genres? All the best, Marcin.